Showing posts with label Foodgasm. Show all posts

Wednesday, 23 October 2019

Cherry bakery and desserts


Reviewing Cherry- bakery and desserts in Behala.

This is like discovering treasure in Behala. This shop has some drool-worthy cakes and pastries at a very reasonable rate.
1- Red velvet cupcake with cream cheese frosting comes at a pocket pinch of Rs. 60 only. The cupcake is smooth and sweet. The cream cheese frosting perfectly compliments the taste of the cake.


2- Red velvet pastry is my favourite. The cream is smooth and light. Tastes great. It almost melts in the mouth. Pocket pinch is just Rs. 60 only. 


3- Chocolate Truffle Pastry has a lovely crunchy texture. There is a generous layer of chocolate. It is only costs Rs. 50.


4- Strawberry Cheese Cake rules all of them. Personally, my taste buds detest the strawberry flavour but this time I would accept the fact that I really liked it. It has a fine texture and the gelatin used doesn't kill the taste of it. Very carefully set and the strawberry jam over it teases your buds with its tanginess. Spending Rs. 80 is just worth it!


Cherry delivers through Swiggy. This hidden treasure is the new zone for satisfying your dessert cravings.


Thank you Cherry for the lovely treats!
-Jaismita Alexander 
An Indian Foodie. 


Wednesday, 9 October 2019

Whole Chicken Roast Recipe


This is an extremely simple whole chicken roast recipe (not stuffed). You can make this awesome dish by following the recipe. 


Ingredients 
  • 1 whole chicken - roughly 1.5 kg
  • For the marinade: 2 tbsps fresh unsweetened yogurt
  • 2 tbsps lime/ lemon juice
  • 2 tsps garlic paste
  • 1 tbsp ginger paste
  • 1 tbsp Cumin Powder 
  • 1 tbsp Coriander powder 
  • 1 tbsp Garam masala powder 
  • 1/2 tsp red chilli powder
  • 1/2 tsp Turmeric Powder 
  • 1/2 tsp salt

Procedure

1. Slightly wash the chicken and get rid of the liver, heart etc. 

2. Put the chicken in a large bowl and marinate with salt, turmeric powder, ginger garlic paste, yoghurt, lemon juice, garam masala powder, coriander and jeera powder. Cover the chicken well with  the mixture. 

3. Leave the chicken for 30 minutes. 


Marinated whole chicken 

4. Pre-heat oven to 180°

5. Take a baking tray and grease it well with butter/ghee/oil. 

6. Shift the marinated chicken in the tray and brush oil/butter/ghee on the chicken. 

7. Let it cook for 30 mins before tossing it on the other side. 

8. Cook till the chicken is tender. Keep checking it with a knife. 

9. The cooking process can take more than an hour. After which, you have to slightly fry the chicken in a kadai. It gives the chicken a good texture and makes it crisp. 

10. You can serve this with rice or paratha. 


Saturday, 25 August 2018

Snack and Munch with Snacking


South Kolkata has got a great addition to it's chain of Cafes. Planning a reunion of friends over some great food and games? Then Snacking should be your next destination. There is live music in the evening with board games. The decor is going to enthral you. I visited this cafe after seeing a lot of Facebook post recommendations and the gang I was supposed to meet were quite determined to visit this place.

At a first glance from outside it might seem to be a pretty ordinary food joint but as it is said, 'Never judge the book by its cover'. The interior is very pretty and cosy. As we were a group of five young ladies, we got a huge table to us and the manager himself attended to us for petty little things.

Here are the items we tried on the menu:

1. Oreo Shake: Very common in every cafe but kid me not, this place probably serves it in the tallest glass with a beautiful topping. And it tastes heavenly.


2. Fried Chicken Strips- Served with fries and salad, this is the juiciest chicken strips I ever had. Only one disappointment is that there were very few pieces for the price charged but then you get the fries with it.


3. Barbecue Delight Pizza- Many cafes fail to serve good pizzas but Snacking did not disappoint me. The pizza was really good with lot of toppings.


4. Grilled Barbecue Chicken with Herbed rice, sautéed vegetables and mashed potatoes- This is a treat for spicy food lovers. Refrain from ordering this if you can't tolerate spice.


5. Chicken steak with sautéed vegetables, mashed potato and rice- Another main course you will surely enjoy. Perfectly juicy tender chicken leg and cheesy mashed potatoes treat your taste buds right.


I would love to visit the place again to try some desserts and snacks. Overall it was worth our time and money. Some people have complained about the quantity of food which I think is a personal opinion because what we were served were just perfect in quantity. It is absolutely reasonable and student friendly. To avoid long queues it is better if you go on weekdays or before 5 pm on weekends and holidays.

Wednesday, 20 July 2016

A Mouth Full of Cheese-Chicken.


How many varieties of Dosa can you name? Not even 10, right? But here at Dosa@twist they have more than 99 varieties of dosa with awesome twist. NonVeg to Veg & Chocolate Dosa they offer you a huge range to choose from. My personal favourite is the CheeseChicken dosa. Trust me, the mozarella cheese makes it a better version of pizza. With the very first bite it makes you crave for more!
And for dessert? Try out the ChocolateDosa.


Ambience is very good, plus friendly staff. Decor and lights make it a perfect place for after college hangouts, sudden dates, family lunch/dinner etc.


Address : 187, Sarah Bose Road, near Deshopriya Park, Kolkata-700029

Free home delivery* T&C Apply. 
Contact: 9051440514/8902392725.


Monday, 11 July 2016

Chocoball Fudge: Quick Dessert in Minutes


Chocoball fudge is a dessert you can quickly prepare without much fuss in no time. Here's a list of all you need to prepare the mouth watering balls. 


Ingredients


  • Muri (puffed rice) 2 cups 
  • Sugar 1/2 cup
  • Marie biscuits 5 pcs.
  • Cocoa powder 1/2 cup
  • Milk powder 3-4 tablespoons 
  • Butter one blob 


Procedure

1-Put the muri, sugar and marie biscuits in the mixer grinder and grind them all fine.

2- Pour the mixture in a mixing bowl and add cocoa powder. Mix well.

3- In a bowl take half cup warm water and add the milk powder along with little butter.

4- Pour the milk in the powdered ingredients and make a dough. Be careful to not make it too watery. Pour the milk little by little while mixing it with a large spoon.

5- Make small dumplings of the dough and keep it on a tray. Put it in the fridge.

6- Take it out and serve chilled with chocolate sauce or sprinkle powdered milk for decoration.

FAQs

Why not liquid milk?
-Powder milk gives you the milk chocolate aroma which the liquid milk cannot.

Why add marie biscuits?
-Marie biscuits have that perfect balance of sweetness that doesn't spoil the chocolaty taste of your fudge.

Is adding butter necessary?
-No. You can do without the butter but remember, butter gives you a special taste to the fudge.

For any other queries, you can contact me on Facebook.


Thank you!
#livetoeat #foodies 

Thursday, 2 June 2016

Recipe: Rainbow Marble Cake


I was in love with the colourful sandwich cake they served in cafes but then I am too lazy and miser to go out and spend. So here's what I do. Get my people shop for the ingredients and then make my cool snacks myself. :P You too can try out.


Ingredients

·         Flour (300g)

·         Sugar (200g)

·         Butter (100g)

·         3-4 eggs
Milk (2-3 tablespoon)

·         Baking powder1/2 teaspoon

·         Cocoa powder (two tablespoon)

·         Cadbury Diary Milk Chocolate (8 cube)

 Vanilla essence (a few drops) 
Strawberry essence ( few drops)
Edible pink food colour (1-2 drops)


Procedure:
1. Take sugar in a bowl and add melted butter to it. Mix it well until the sugar blends with the butter and becomes fine.
Tip: Use grounded/powdered sugar to save time. 
2. Now add the eggs and beat it well.

Caution: Do not add eggs to hot butter unless you want sweet scrambled eggs.
3. Add flour little by little and keep mixing it.
4. Add half teaspoon of baking powder.
5. Keep beating the batter until a thick, smooth consistency is achieved.
6. Now take out the mixture in equal quantity in three separate blows and keep aside.
7. Break the chocolate cubes in small pieces and using the double boiler method melt it smooth. Add little milk to make it quick.

8. Now add this melted chocolate to one bowl of the batter you have kept aside. Mix it well and add cocoa powder. Beat well. Now in another batter add strawberry essence and edible pink colour. Mix it well. Add vanilla essence to the white batter. Now you have three batters- one brown, one pink and the other white. 

9. Grease the baking mould with oil and sprinkle some flour. 

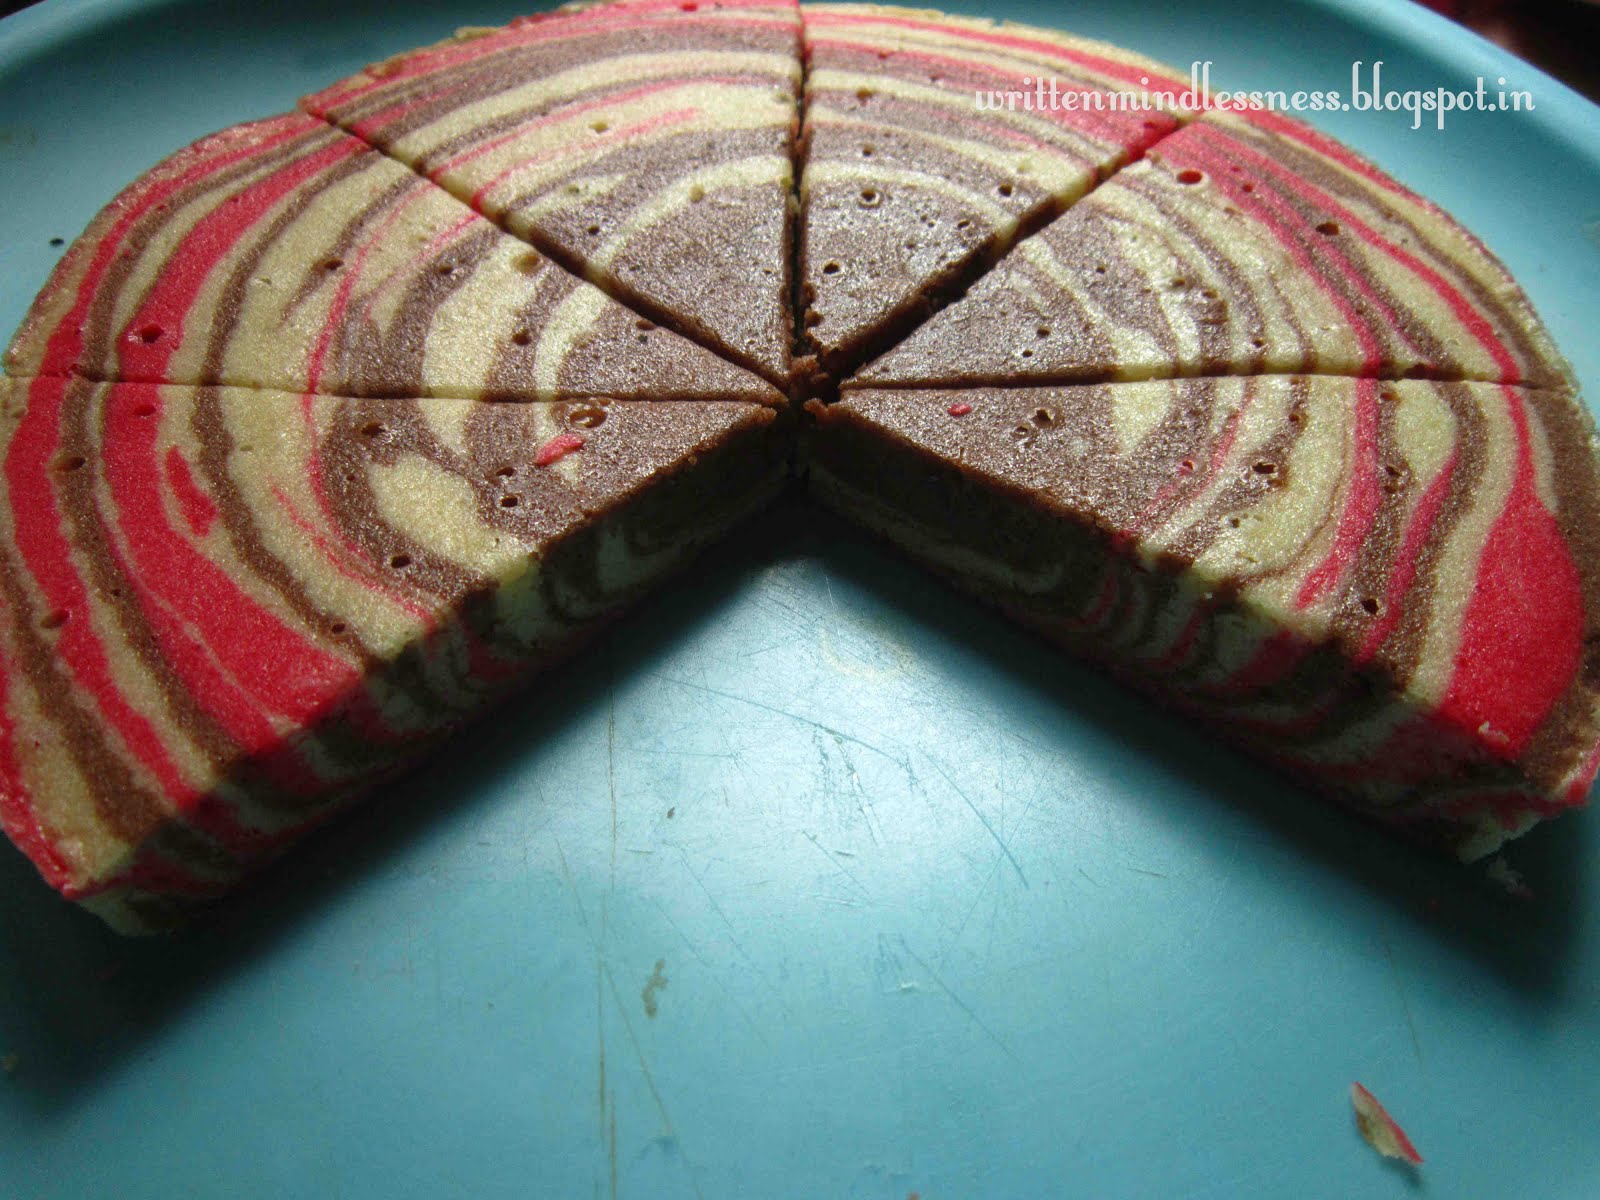
10. Now comes the main part of bringing the texture of the rainbow cake. Take a tablespoon for each batter (Brown, pink and white). Drop one tablespoon of white batter in the center of the mould. Then exactly on top of it drop the pink batter followed by the brown. Again drop the white batter then the pink and brown. Repeat this until you have put the batters one after another in the baking mould. The mixture will keep spreading on its own as you keeping dropping the batters in the center.

Tip: Pre-heat oven to 180 degrees while you are pouring the batter.


11. Put the filled mould in the oven and bake for 40 minutes.
12. After 40 minutes check if the cake is ready or not by pricking in a fork. If the fork comes out clean, the cake is ready.
13. Turn off the oven and keep the cake inside for some time to allow it to cool.
14. When it cools down, take it out from the mould and serve with your favourite strawberry jam or chocolate topping.


You can make rainbow muffins by changing your mould. Use cupcake moulds instead. Tada! There are your fluffy rainbow muffins!


Do share your views if you have tried the recipe. :)

Regards,
Jaismita Alexander.

Monday, 30 May 2016

Marble Cake: Easy 14 Steps


Though my blog clearly shouts out the name 'WRITTEN MINDLESSNESS' but this post is quite mindful. After posting a few pictures on Facebook of a Marble Cake I baked today, many have asked for the recipe of it. So here it is, for everyone's convenience I am posting the most easiest recipe of the delicious dessert.


Ingredients
·         Flour (300g)

·         Sugar (200g)

·         Butter (100g)

·         3-4 eggs
Milk (2-3 tablespoon)

·         Baking powder1/2 teaspoon

·         Cocoa powder (two tablespoon)

·         Cadbury Diary Milk Chocolate (8 cube)

 Vanilla essence (a few drops)


Procedure:
1. Take sugar in a bowl and add melted butter to it. Mix it well until the sugar blends with the butter and becomes fine.

Tip: Use grounded/powdered sugar to save time.

2. Now add the eggs and beat it well.

Caution: Do not add eggs to hot butter unless you want sweet scrambled eggs.

3. Add flour little by little and keep mixing it.

4. Add half teaspoon of baking powder and vanilla essence. 

5. Keep beating the batter until a thick, smooth consistency is achieved. 

6. Now in a separate bowl take out half of the mixture and keep aside.

7. Break the chocolate cubes in small pieces and using the double boiler method melt it smooth. Add little milk to make it quick.

8. Now add this melted chocolate to the half of the batter you have kept aside. Mix it well and add cocoa powder. Beat well. Now you have two batter- one brown and the other white. 

9. Grease the baking mould with oil and sprinkle some flour. 

10. Now comes the main part of bringing the texture of the marble cake. Take a tablespoon for each batter (Brown and white). Drop one tablespoon of white batter in the center of the mould. Then exactly on top of it drop the brown batter. Again drop the white batter. Repeat this until you have put the batters one after another in the baking mould.

Your mould should look like this now.


Tip: Pre-heat oven to 180 degrees while you are pouring the batter.

11. Put the filled mould in the oven and bake for 40 minutes.


12. After 40 minutes check if the cake is ready or not by pricking in a fork. If the fork comes out clean, the cake is ready.

13. Turn off the oven and keep the cake inside for some time to allow it to cool.

14. When it cools down, take it out from the mould and serve with your favourite chocolate topping.


Do share your views if you have tried the recipe. :)

Regards,
Jaismita Alexander.